
A reference guide for laboratory solution preparation
Reconstituting lyophilized peptides: preparing a laboratory stock solution.
In the laboratory, a lyophilized peptide is prepared as a stock solution before it goes into an assay, a calibration or an analytical method. This guide covers reconstitution of the dry powder into that laboratory stock solution, from the sealed vial to a clear, labelled solution of known concentration. It walks through the whole method in order and points to the specialist guides on solvents, pH, problems and storage.
For laboratory research use only. Not for human or veterinary use.
In this guide
What is a stock solution, and why is it concentrated?
A stock solution is prepared more concentrated than the assay needs, then diluted into the assay buffer.
In the laboratory, reconstitution produces a stock solution, usually 10 to 1000 times the concentration of the working solution. A consensus paper on peptide standards for mass spectrometry gives that range, and the reasons for it are practical.
A concentrated stock does three things:
- It keeps the first solvent small. Only a small volume of stock enters the assay, so an acid or organic solvent used to dissolve the peptide contributes little to the final mixture.
- It limits loss to the container. A concentrated solution loses a smaller share of its peptide to the walls of the tube than a dilute one does.
- It lets working solutions be made as needed. They are diluted from the stock as close as possible to the time the method needs them, rather than prepared far in advance.
Dilute solutions are also the less stable ones. Thermo Fisher’s handling instructions describe peptide solutions as unstable, and more so the lower the concentration. That caution concerns peptide solutions broadly; it is not a statement about any GPC material.
What should you check before you open the vial?
Reconstitution for an analytical method starts before the vial is opened, with the certificate, the sequence and the method’s solvent limits. A suitable solvent meets three conditions: it dissolves the peptide, it suits the experiment, and it does not react with or degrade the peptide.
Which amount are you starting from?
- What to read: the certificate for the lot, and whatever it reports about the amount: a measured net content, a net peptide content, or only the label amount.
- Why it matters: net peptide content is the share of a weighed powder that is peptide, usually measured by amino acid analysis, and it excludes water and counterions. The label amount, a measured content and a corrected gross mass each give a different concentration from the same volume of solvent.
- Watch for: moisture. Water taken up from the air lowers the peptide content of a weighed portion, one more reason to keep the vial sealed until it has warmed.
Which solvent is likely to work?
- What to read: the amino acid sequence, before any solvent touches the powder. Its charged residues are the first guide to whether water will dissolve it.
- Why it matters: some suppliers print a lot-specific solvent on their certificate. GPC publishes no suggested solvent or solubility figure for any compound, so the sequence and your method decide.
- Next step: the charge and pH guide shows how to count the charges, and the solvent guide turns the count into a first solvent.
What can the assay tolerate?
- What to read: your method’s limits for acid, base and organic solvent.
- Why it matters: the highest usable concentration of any first solvent depends on how well the assay tolerates it, so the method narrows the choice before the peptide does.
- Plan for: the dilution. The working concentration and the stock factor together tell you how much of the first solvent will reach the assay.
If you plan to have a vial analyzed, set it aside before you start. A solution you prepare is not a sample the GPC Verification Program accepts: the program needs the original sealed vial, with its label intact, never opened, relabelled or transferred.
How do you prepare a peptide stock solution, step by step?
The steps below prepare a stock solution; in this guide, reconstitution always means preparing one for a laboratory method. Each step comes from supplier handling documents or methods papers, and none of them offers a single recipe: the sequence and the method choose the solvent.
- 01
Let the sealed vial warm up
Let the sealed vial reach room temperature before you open it, preferably in a desiccator, so the powder takes up less moisture from the air. The sources give no time for this, so none is given here. If you weigh out a portion, work quickly and reseal the container.
- 02
Bring the powder down
Briefly centrifuge or tap the vial so that all the powder is at the bottom before any solvent goes in.
- 03
Test solubility on a small portion
Try the first solvent on a small portion before committing the whole amount. Choose a first solvent that freeze-drying can remove, such as water, dilute acetic acid or ammonium bicarbonate: if it fails, the portion can be freeze-dried and another solvent tried on the same material. When the amount is too small to divide, the guide to lyophilized peptides covers dissolving the whole vial.
- 04
Choose the first solvent
Start from water, or from the first solvent the sequence’s charge count suggests, within the limits of the method. If the first solvent is not water, dissolve the peptide completely in it before adding water or buffer: peptides usually dissolve faster in an acid or organic solvent alone than in a mixture with water.
- 05
Add the solvent slowly
Add the solvent slowly, without splashing or bubbles, so that it wets the powder. Splashes and bubbles create air–liquid surfaces, and the next step explains why those matter.
- 06
Swirl by default and avoid foam
Swirl gently and give the powder time: dissolving a peptide can occasionally take several hours. Foam is the thing to avoid. Work on proteins has found that shear in the liquid is unlikely by itself to damage most of them, while moving air–liquid interfaces can be very damaging, and vigorous shaking can make foam. A brief, gentle vortex that makes no foam is consistent with every source.
- 07
Sonicate briefly or warm gently, if needed
If particles remain, a few minutes in an ultrasonic water bath can help break them up, provided the sample does not warm excessively. Careful warming also helps, to no more than 40 °C. Keep sonication short and in a bath: sonication has been shown to aggregate a range of proteins.
- 08
Confirm that the solution is clear
A dissolved peptide solution is completely clear, with no flecks or cloudiness. If it has gelled, looks cloudy or shows particles after sonication, the peptide is suspended, not dissolved, and a stronger solvent is needed. Light scattering, or the absorbance of a dilution series measured with and without centrifugation, confirms it. Centrifuge the solution before it goes into a method, so any residue stays in the tube.
- 09
Only then, dilute into buffer
Add buffer salts once the peptide has dissolved, not before: salts hinder solubility, and a peptide that fails to dissolve in buffer can be hard to recover. Add the concentrated solution dropwise into the buffer with gentle, constant stirring, so the peptide never meets the buffer at a high local concentration and any haze shows as it starts.
Record the solvent, the volumes, the times and any sonication or warming as you go. The preparation record further down lists what to keep.
Where do the sources disagree?
Supplier documents do not all say the same thing. Three differences matter at the bench, and each one resolves once you look at what the source was guarding against.
Swirling or vortexing
What the sources say
R&D Systems, writing about proteins, advises gentle agitation and warns that vigorous shaking can cause foaming. JPT’s peptide solubility flowchart says to vortex or sonicate after each step, and LifeTein vortexes gently while dissolving in DMSO.
How this guide reads them
The shared concern is foam. Swirl by default. A brief, gentle vortex that makes no foam is consistent with every source.
Water first, or buffer directly
What the sources say
Hoofnagle and colleagues advise against dissolving in PBS because salts hinder solubility, and Sigma-Aldrich warns that material that fails to dissolve in assay buffer can be hard to recover. Bachem recommends PBS at pH 7.0–7.4 where a concentration of 1 mg/mL or less is enough. Thermo Fisher’s instructions allow sterile water or buffer.
How this guide reads them
The positions agree once concentration is considered. Dissolve in water or a volatile first solvent, then add buffer. For dilute solutions, 1 mg/mL or less, some suppliers dissolve directly in PBS.
How long to wait
What the sources say
An R&D Systems protein method allows 15 to 30 minutes at room temperature with gentle agitation. Bachem notes that dissolving a peptide occasionally takes up to several hours.
How this guide reads them
Time is a legitimate step. Give the solution time before reaching for sonication, warming or a stronger solvent, and judge it by its clarity rather than by the clock.
Suppliers also set different limits for organic solvent in cell-based assays. The solvent guide sets them side by side.
What changes when you add more solvent?
The concentration changes; the amount of peptide does not.
Concentration is the amount divided by the volume of solution. A drop of ink in a beaker and the same drop in a bucket: the ink is the same, and only its concentration differs. Forty marbles spread across a small tray or a large one are still forty marbles.
The figure makes the same 1.000 mg of peptide up to three final volumes. The amount is fixed in every panel. Only the concentration moves, by a factor of ten each time, and at an illustrative molecular weight of 1000.0 g/mol the molar concentration moves with it.
The same rule governs dilution. Concentration multiplied by volume is the amount, so the amount transferred from a stock is the amount in the working solution made from it: C1V1 = C2V2.
Dissolved powder adds very little volume, about 0.7 µL per milligram by the usual estimate for proteins, so for most stocks the volume of solvent added is effectively the final volume.
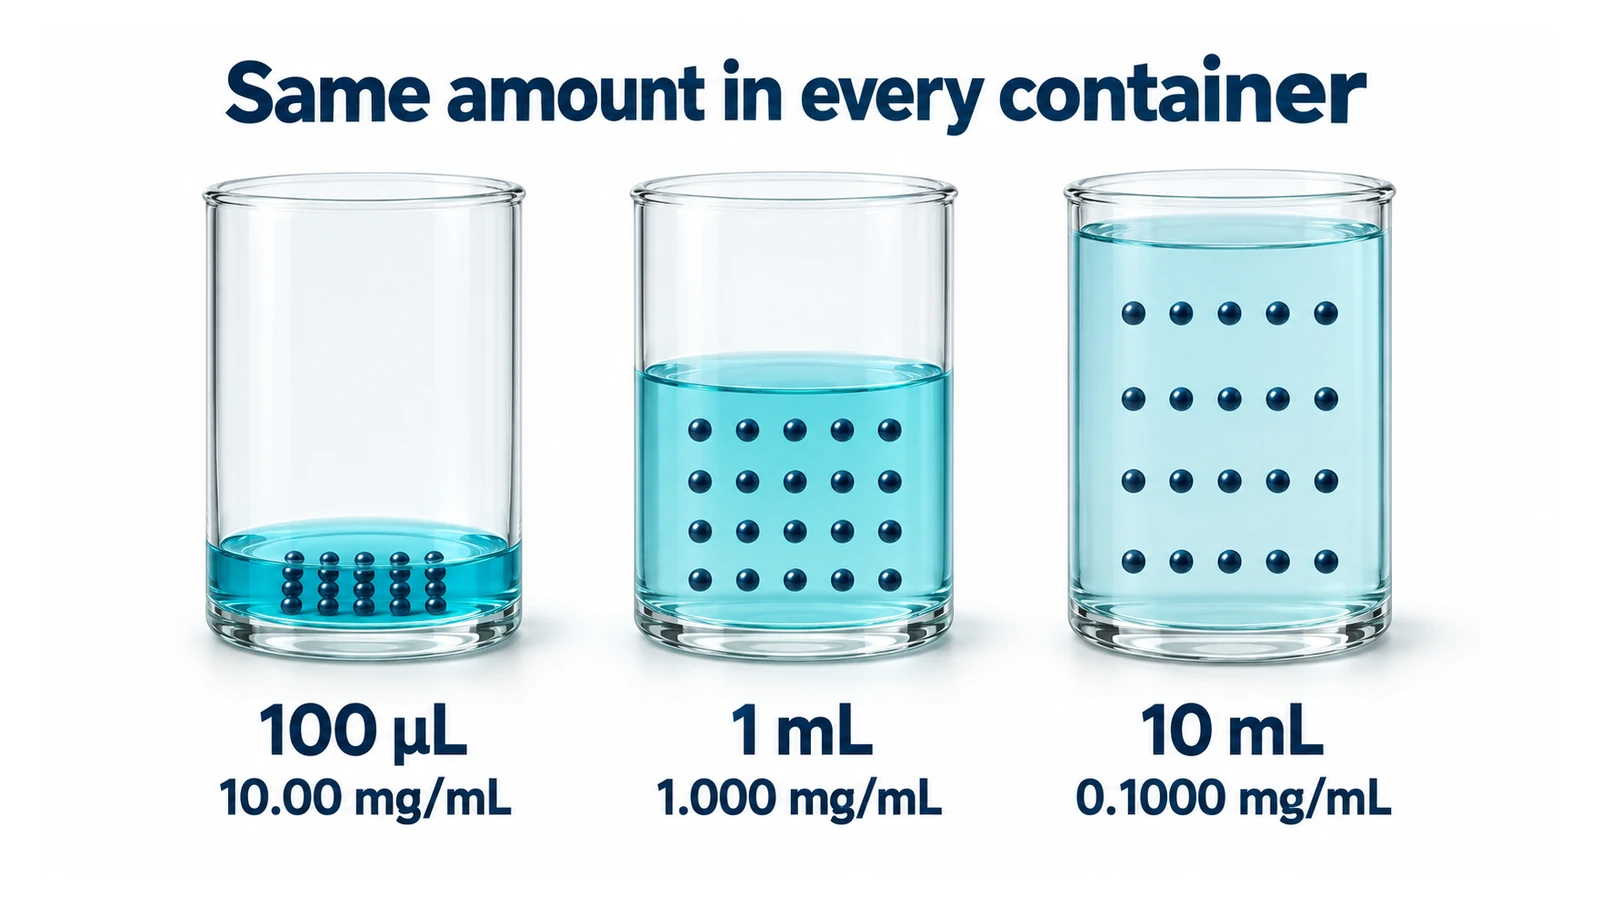
- 100 µL10.00 mg/mL
- 1 mL1.000 mg/mL
- 10 mL0.1000 mg/mL
- Final volume 100.0 µL
- 10.00 mg/mL, or 10.00 mM at 1000.0 g/mol
- Final volume 1.000 mL
- 1.000 mg/mL, or 1.000 mM
- Final volume 10.00 mL
- 0.1000 mg/mL, or 100.0 µM
Illustrative values, not a GPC measurement. The molecular weight is chosen to make the step from mg/mL to mM easy to follow, and it matches no GPC compound.
What does working aseptically mean for a stock solution?
In a laboratory sense, aseptic work keeps enzymes and microbes out of the stock solution. It does not make the solution sterile, and it does not make it stable.
Three habits do most of the work:
- Wear gloves. Hands carry enzymes and bacteria, and either can contaminate a peptide solution.
- Start sterile. Use sterile water or a sterile dilute acid, sterile containers and clean surfaces.
- Let the solvent help. Acid or organic solvent in a stock solution also slows microbial growth.
A 0.2 µm filter removes bacteria that may have entered the solution. Filters are rated by their ability to retain a small test bacterium, about 0.3 µm across, and 0.2 µm and 0.22 µm are treated as the same rating. A filter can also have some pores larger than its nominal size.
Filtration does not remove endotoxin, and a filtration at the bench is not proof of sterility. In the FDA’s guidance on aseptic processing, a sterile filtrate depends on a filter validated by microbial challenge and checked by integrity testing. Without that record, write “0.2 µm filtered” in the notebook, not “sterile”.
Sterility also says nothing about chemistry. Bachem notes that peptides in solution can slowly degrade, even when the solution is sterile and free of oxygen. Membrane choice, and when to filter, are covered in the storage guide.
What goes on the tube, and what goes in the notebook?
Record each reconstitution in the laboratory notebook, with the stock solution’s concentration, solvent, amount basis and date. The label on the tube carries the short version.
The tube label carries:
- the name of the solution, in your own words;
- the concentration, in mg/mL or mM;
- the solvent, as its final composition;
- the source lot number;
- the date of preparation and the preparer’s initials;
- a re-test or discard date, set by your laboratory.
Those fields follow the WHO good practices for pharmaceutical quality control laboratories, which ask that a solution prepared in the laboratory be labelled with its name, its date of preparation and the analyst’s initials, a re-test or discard date as justified, and its concentration. The re-test date is your laboratory’s decision. This guide sets none, and no GPC figure implies one.
The notebook holds the rest: the amount basis and the amount, the molecular weight and whether it is for the free peptide, the final volume and the calculation, the first solvent and each step, the clarity check, any filtration and its membrane, the tubes and the aliquot volume, the storage temperature, and any deviation. The same WHO text asks for a record of how volumetric solutions were prepared, and the habit serves a peptide stock just as well.
The calculator produces a preparation record with the date, lot, basis, solvent, volume and concentrations, and a blank for initials, ready to copy into a notebook or print.

- Blank label fieldsContents; concentration; final solvent; source lot; date; initials; re-test or discard date.
- WHO TRS 957, Annex 1, §10.5
- WHO good practices for quality control laboratories
Where does the work go from here?
A clear, labelled stock solution is the starting point for the method. Two guides pick up from here.
Keeping the stock solution
Solutions change faster than dry powder. Bachem’s guidance is to divide a peptide solution into aliquots and keep them frozen below −15 °C. The storage guide covers how small to make the aliquots, which tubes to use, freezing and thawing, adsorption to surfaces, and filters.
When the solution is not clear
Haze, particles, a gel, foam or a precipitate on dilution each point to a different cause. The troubleshooting guide works from what you see to what to try, and to the point where it is better to recover the material or start again.
Common questions about preparing a peptide stock solution.
How do you reconstitute a lyophilized peptide as a laboratory stock solution?
There is no universal recipe: the sequence and the method choose the solvent. Let the sealed vial reach room temperature in a desiccator, bring the powder down, and try a small portion in water or in the first solvent the charge count suggests. Dissolve it completely in that solvent, mixing gently without foam, with a few minutes of bath sonication or warming to no more than 40 °C if needed. Confirm that the solution is clear, then dilute into buffer to reach the stock concentration.
How do you test solubility on a small portion?
Weigh out a small portion and try the first solvent on it before committing the whole amount. Choose a first solvent that freeze-drying can remove, such as water, dilute acetic acid or ammonium bicarbonate, so that a portion that fails can be dried and tried again. Sonicate briefly before deciding the solvent has failed: a gel, haze or visible particles mean the peptide is suspended, not dissolved. When the amount is too small to divide, the guide to lyophilized peptides covers dissolving the whole vial.
How do you confirm that a peptide has dissolved completely?
A dissolved peptide solution is completely clear, with no flecks or cloudiness. Two laboratory checks go further: light scattering, or the absorbance of a dilution series measured with and without centrifugation. If the absorbance falls once the sample is spun, some material was suspended rather than dissolved.
What volume gives a 1 mg/mL or a 1 mM stock solution?
The volume is the amount divided by the target concentration. At 1.000 mg/mL, the volume in millilitres equals the peptide amount in milligrams, so 2.000 mg needs 2.000 mL. At 1.000 mM, divide by the molecular weight first: 2.000 mg at an illustrative 1250.0 g/mol is 1.600 µmol, which needs 1.600 mL. Record which amount you started from, whether the label amount, a measured content from a certificate, or gross mass × net content × HPLC area, because each gives a different volume.
Should a peptide solution be swirled or vortexed?
Swirl by default and avoid foam. Work on proteins points to moving air–liquid interfaces, rather than shear in the liquid, as the main cause of damage, and vigorous shaking can make foam. Peptide suppliers do vortex, and a brief, gentle vortex that makes no foam is consistent with every source.
How do you work aseptically when preparing a stock solution?
In a laboratory sense, aseptic work means gloves, clean surfaces, and sterile solvents and containers, which keep enzymes and microbes out of the stock solution. A 0.2 µm filter then removes bacteria, but it does not remove endotoxin, and a bench filtration without a validated, integrity-tested filter is not proof that the solution is sterile. Record the step as “0.2 µm filtered”, and remember that a sterile solution can still change chemically.
Can a solution I prepared be analyzed under the GPC Verification Program?
No. The program needs the original sealed vial with its label intact, and the material must not be opened, relabelled or transferred. If you might want a vial analyzed, set it aside unopened before you prepare any solution. The guide to getting a vial analyzed in Canada explains the steps.